Mar 11, 2026
A judgment has been awarded to you, but the money hasn’t arrived, yet. We’ve discussed the option of Garnishment in my previous blog. You probably have also heard of a Writ of Seizure and Sale, but how to start the process? Does it have to be filed at the Sheriff’s Office? Did you also accidentally call the York regional police for a sheriff? Oops! Fortunately, there is a new route to have a Writ issued electronically via WritFiling. We will walk you through both options.
Issuance Through the Registrar
A creditor can submit a Writ of Seizure and Sale (Form 60A) (“Writ”) to be issued with a Requisition form at the court registrar where the original proceeding commenced[1].
The Requisition form should detail the date and the amount of payment received, the amount owing, and the rate of post-judgement interest[2]. A copy of the Order should be attached to the Requisition form.
Once a Writ is issued, it may be filed with a Sheriff[3]. The Sheriff’s office is the Enforcement office of the Superior Court of Justice (NOT the police office!)
While the Writ should be issued where the Judgment was granted, it must be filed at the Enforcement office in the region where the debtor lives or owns assets. For example, if your judgment is issued in Toronto and the debtor lives in Richmond Hill. The Writ should be issued in Toronto, but the issued Writ is to be filed at the Sheriff’s Office in Newmarket court.
You may locate the Enforcement office through the following website: https://www.onwrits.ca/en/enforcement-offices/.
For Writ of Seizure and Sale of a property, the Writ should include a legal description of the real property, which can be found in the parcel register. Check out my previous blog: a walk through of the parcel register.
Issuance Through the WritFiling
During the Covid-19 pandemic, technology streamlined the process for legal professionals to issue and file Writs remotely[4].
An authorized user such as a lawyer or a paralegal[5] (for Form 20D: Writ of Seizure and Sale of Land only) may electronically issue the Writ through WritFiling, a product of Teranet software, instead of filing through registrar and enforcement office[6]. An electronically issued Writ is considered to have been both issued by the court and filed with the Sheriff[7].
To use this service, authorized users may submit an application and will receive a secure token. WritFiling has very detailed user guide on application and how to file and issue a Writ.
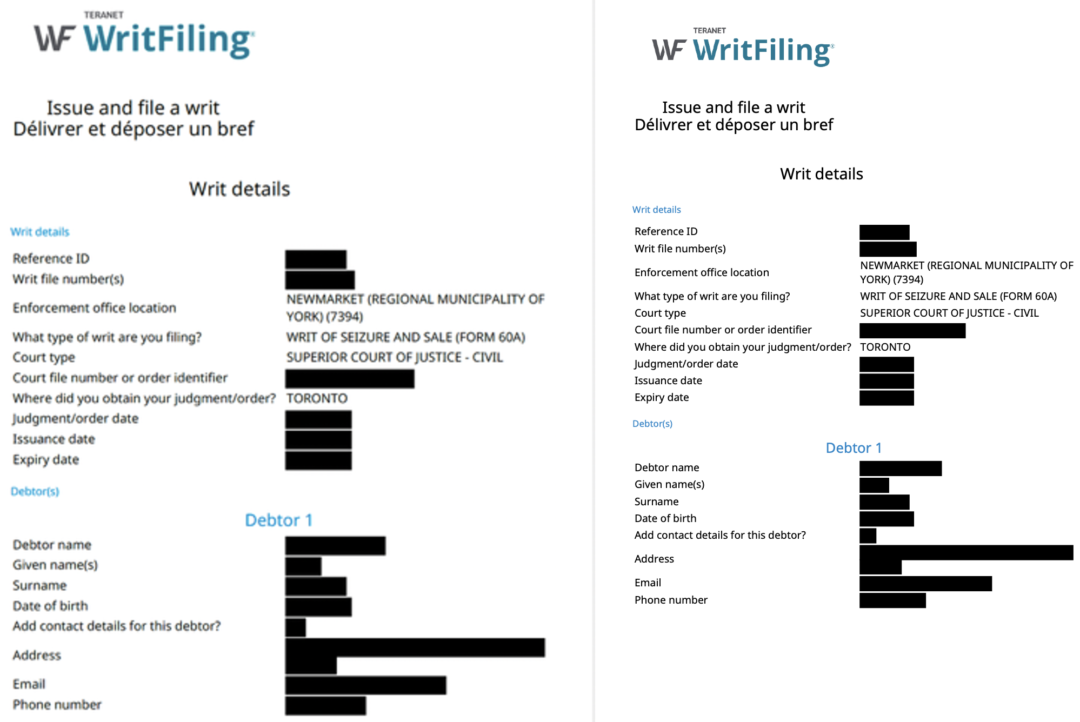
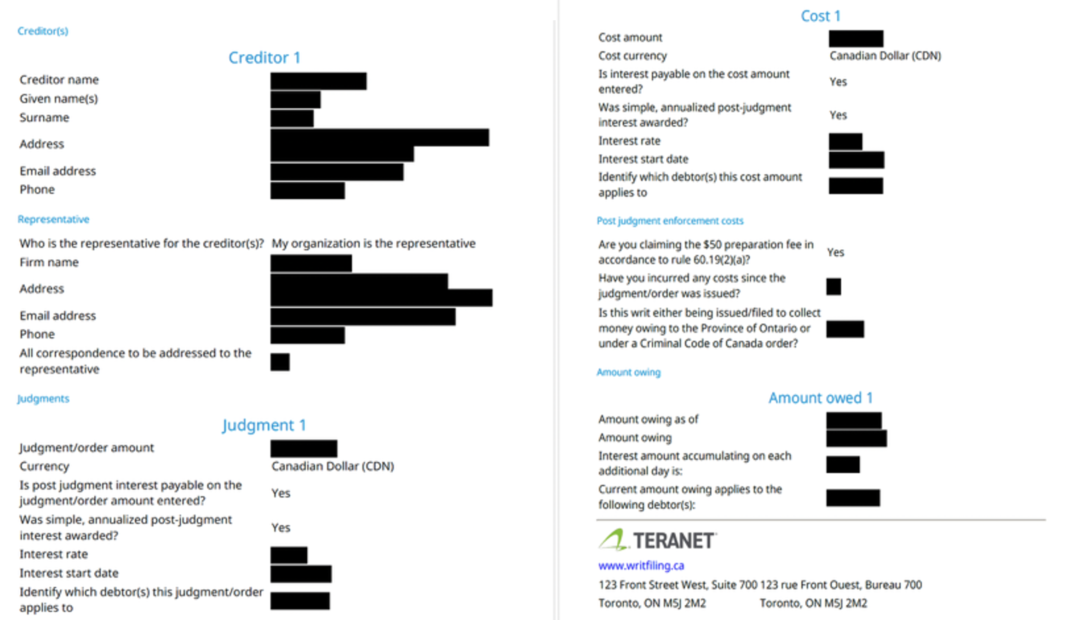
The filing process is very straightforward, and the issued Writ is designed to be clear and easy to understand. A service fee of $34.95 plus HST will be applied each time. Below is a sample of an electronically issued Writ of Seizure and Sale for your reference.
Whether you choose to file the Writ through the court registrar yourself or retain a lawyer to file through WritFiling, understanding the procedural nuances is the key to successfully enforcing the Judgment and collecting the debts. In my next blog, we will dive deeper into the next phase: how to direct the Sheriff to enforce your issued Writ.
Jennifer Jiang
Nothing contained in this post constitutes legal advice or establishes a solicitor-client relationship. If you have any questions regarding your legal rights or legal obligations, you should consult a lawyer.
[1] Rules of Civil Procedure, R.R.O. 1990, Regulation 194 [“Rules”], Rule 60.07(1).
[2] ibid
[3] Ibid at Rule 60.07 (5.1)
[4] “Teranet WritFling Solution Expands Services to Offer Convenience and Facilitate Collaboration.” Teranet, November 23, 2020, Online: <https://www.teranet.ca/insights/teranet-writfiling-solution-expands-services-to-offer-convenience-and-facilitate-collaboration/>
[5] Supra at Rule 60.07(0.1)
[6] Rules, Rule 60.07(1.1)
[7] Ibid at Rule 60.07(1.3); “How do I file/issue or file a writ?”, WritFiling, Online:<https://www.onwrits.ca/en/help-support/support/faq/issue-file-a-writ/how-do-i-file-issue-or-file-a-writ/>
Mar 15, 2024
In the process of enforcing a Judgement, debtors sometimes prove elusive and play hard to get, making the pursuit of what’s rightfully yours extra difficult. However, there is a simple but strategic move that might just turn the table around – garnishing the debtor’s bank account.
Step 1: Locate and Read the Cheque
To garnish the debtor’s bank account, your first move is to investigate the account details. Starting by combing through past financial transactions between the creditor and the debtor, particularly those involving cheque payments, can be the game-changer. If the debtor has made any payment by cheque, you can use the cheque as evidence to support your belief that the debtor holds bank account(s) at the financial institution. In case the original cheque is lost, don’t worry – your bank can provide transaction records, which will include an image of the cheque.
On the cheque, essential information such as the address of the debtor, the information of the financial institution (name and address), and the bank account information can be found.
The bank account details can be found within the string of numbers at the bottom of the cheque, including the 5-digit transit number which identifies the branch where the account was opened; the 3-digit financial institution code; and the 7 to 12-digit account number which specifies which bank account where the money will be withdrawn from. Please note that the cheque number at the top right corner might also be found at the bottom left corner.
In case where no payment has been made by the debtor, it is crucial to gather as much information about the debtor’s financial situation as possible. You should seek legal advice and conduct an Examination in Aid of Execution.
Step 2: Requisition for Garnishment
As per Rule 60.08 (4) of the Rules of Civil Procedure, the creditor shall file a Requisition for Garnishment (Form 60G), a copy of the Judgement, an Affidavit, Notice of Garnishment (Form 60H) and a blank Garnishee’s Statement with the registrar.
The Garnishee is a third party that holds property of the debtor that can be used to satisfy the debtor’s debt, in this case, is the financial institution holding an account for the debtor.
The information discovered from the cheque becomes the key to prepare the legal documents, such as the name and address of the financial institution, as well as the debtor’s bank account information which should be detailed in your Affidavit. You also need to calculate the principal owing amount as well as the post-judgement interest to-date. Check our previous blog post to see how to calculate post-judgement interest.
Two important notes: First, a Notice of Garnishment can only name one debtor and ONE Garnishee. If multiple entities own debt to the debtor, prepare separate Notices of Garnishment to each of the Garnishees. Secondly, the filing should be made where the court proceeding (resulting in the Judgement being enforced) was commenced, as the registrar will forward a copy of the issued Notice of Garnishment to the Sheriff where the debtor resides. You can find the Sheriff’s office address and district via the link here, provided by the WritFiling website.
Upon receiving the issued Notice of Garnishment, serve it with a blank Garnishee’s Statement to the Garnishee (the local branch of the financial institution); also serve it with a copy of the Affidavit on the debtor.
Step 3: Issuance of the Garnishment Cheque
The Garnishee is required to pay the funds in the debtor’s account to the Sheriff’s office within 10 days after being served with the Notice. This payment should be made by a bank draft payable to the Minister of Finance. Once the cheque is cleared, the Sheriff’s office will issue the cheque to the creditor or the creditor’s counsel.
In some special cases where the debtor’s account is jointly owned, the creditor will be notified by the Garnishee and must serve the co-owner a Notice to Co-owner of the Debt along with a copy of the Garnishee’s Statement. In these circumstances, the creditor should seek legal advice from a lawyer.
When your debtor plays hard to get, garnishing his or her bank accounts would be the strategic move to go!
Jennifer Jiang
Nothing contained in this post constitutes legal advice or establishes a solicitor-client relationship. If you have any questions regarding your legal rights or legal obligations, you should consult a lawyer.
